Live Recording - Imani Republic Christian band.
- Roy Fry

- Nov 2, 2021
- 4 min read
Two methods of live recording we considered.
The first method was to record the whole rhythm section live, so we can get a nice warm sonic sound created.
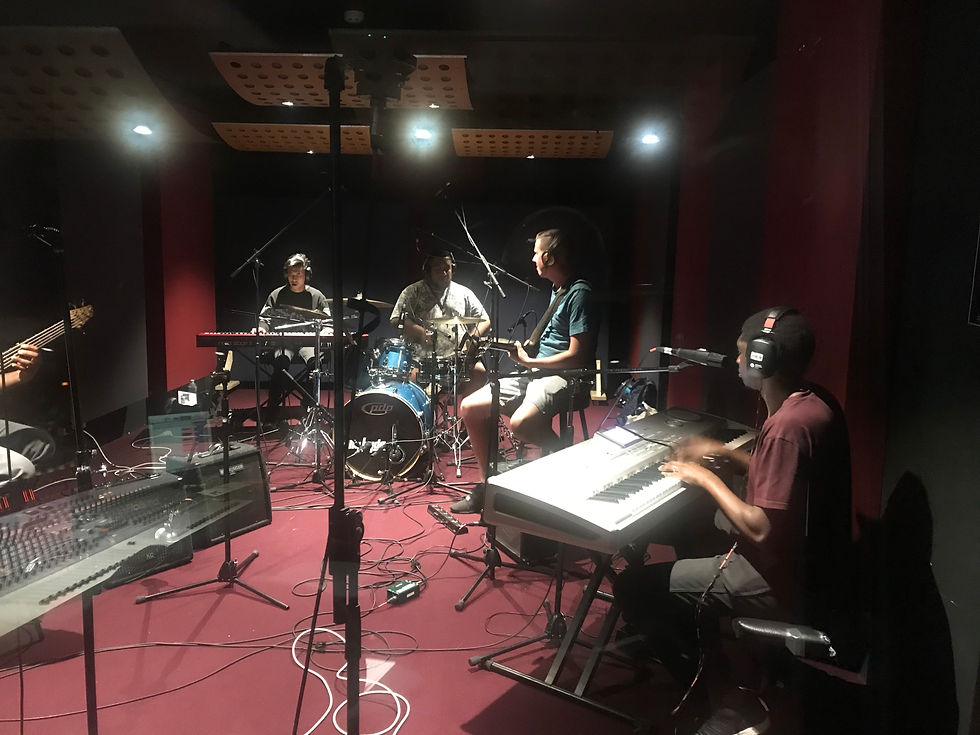
The idea was to create a natural feel about the music and give the vocals more of a live feel in their headsets, rather than a studio production feel.
So to be able to create this feel, l did some research into which way might be best to achieve a satisfactory result by the end of the recording session. There were 2 methods that I could use as a guideline.
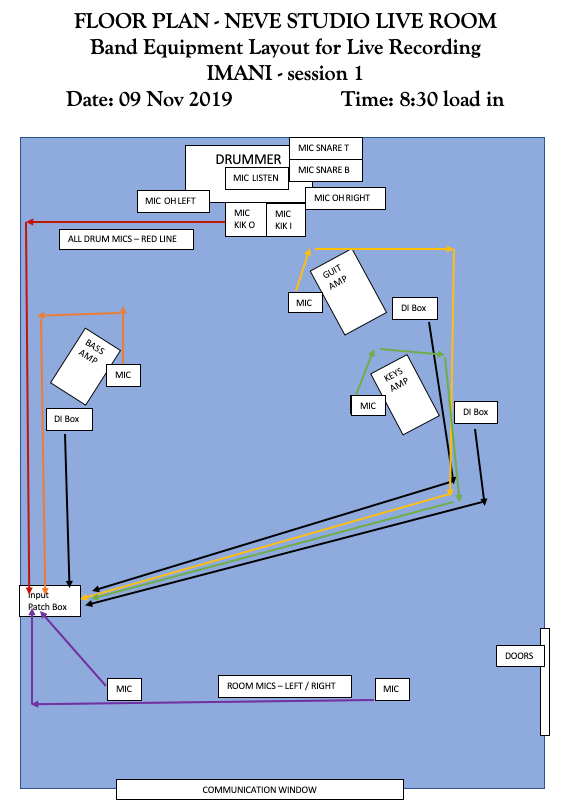
In the first method, you do not need any partition baffles and you have the opportunity to experiment with the amplifier placement, and with the volume levels of each amplifier to make it work. with the drummer playing at the same time. I draw a map prior to the recording session so that l had a rough starting point.
See the map below.
Now I did change the amplifier placement on the day, but the concept remains the same. The video below that l watched, gave me a guide on how to create a live recording session without baffles, by using a microphone over the drum kit as a monitoring tool. The idea is a mono overhead microphone will give you a better sound level on the instrument and balance for the live sound you want to record.
The mono microphone can also double up as an overhead recording microphone. You can also monitor the levels of Hi-Hats, Toms, and Ride cymbals, in the mix and make adjustments with the mono microphone for balancing the whole drum kit sound from the control room. by:
Pointing the side of the amplifiers towards the kick drum with the speaker pointing to the middle of the room. The side of the amplifier will create a tiny natural partition baffle compared to the amplifier speaker pointing straight at the kick drum microphones. You will never get rid of all the instruments spill, as the sound will be bouncing around the live room, but you can create a good sonic balance between all the instruments, just by finding the best spot for the amplifiers in comparison to the drum kit. Always monitoring the sound in the control room as you go along.
Checking the drum microphones, Kick in, kick out, top of the snare, the bottom of the snare and all amplifier microphones. Take your time and start fine-tuning the overall sound by monitoring the sound levels in the control room as the band plays. Make sure to keep a check on your mono microphone balance.
Blending the left and right room microphones and move them to a suitable recording position in the live room. Once you find the right positioning for your room microphone, double-check that all the microphones are registering in the console and the DAW. Now you can record your session
The drum microphones are now sounding good, all the amplifier sounds are now being heard through the overhead mono microphone, and the amplifier microphones are sounding good too. So now the balance is set between all the microphones in the control room.

The second method of recording a live band. (See above map)
This is probably the way l should have recorded the band - Imani Republic. The way l recorded the band would have had a better result by using partition baffles as it would have created a better individual sound separation of the instruments.
Step 1
Place the amplifiers on both sides of the drum kit with the speakers pointing forward in the same direction as the drum kit.
Step 2
Place partition baffles between the drum kit and amplifiers on both sides of the drum kit, to eliminate as much of the direct spill from the instruments as possible. You are always going to get some sound spilling into other microphones between the instruments, but the direct spill has been cut right down to a bare minim by using the partition baffles and anything else you find to dead in the sound.
Step 3
Once you have set all the microphones on the drum kit and amplifiers, go and check the sound through the control room monitors and listen to the overall sound of the band. If the sound doesn't have a good balance due to one of the amplifiers being too loud or too soft, have a talk to the instrument player and ask them to adjust their volume in accordance with the mix in the control room.
Step 4
With the room microphones (Left and Right) place the microphones in the best position according to the blend of the overall sound of the band, you hear in the control room. Double-check that all the microphones registering in the console mixer and the DAW. Now you can start recording the band.
Reference Video's
First method on how to record a live band
How to Record Live In Studio
https://youtu.be/lzXXHoY4x2U
Second method on how to record a live band
Recording Your Band Live In 1 Room
https://youtu.be/Ud-Le19No4U
Reference
Creative Sound Lab. (2016, February 2). How to Record Live In Studio. Retrieved November 16, 2019, from https://youtu.be/lzXXHoY4x2U.
Ultimate Studios, Inc. (2017, October 17). Recording Your Band Live In 1 Room. Retrieved November 16, 2019, from https://youtu.be/Ud-Le19No4U.


Comments