Learning Project WEEK 10 – AUM162
- Roy Fry

- Aug 28, 2020
- 2 min read
DATA
This week I’ve been adding different midi parts to help keep the song interesting and to give each section of the song some of its own characteristic vibe or a little bit of personality.
At the moment I’ve been mainly using Pro Tools midi plug-in Xpand!2 for all the instrument sounds.
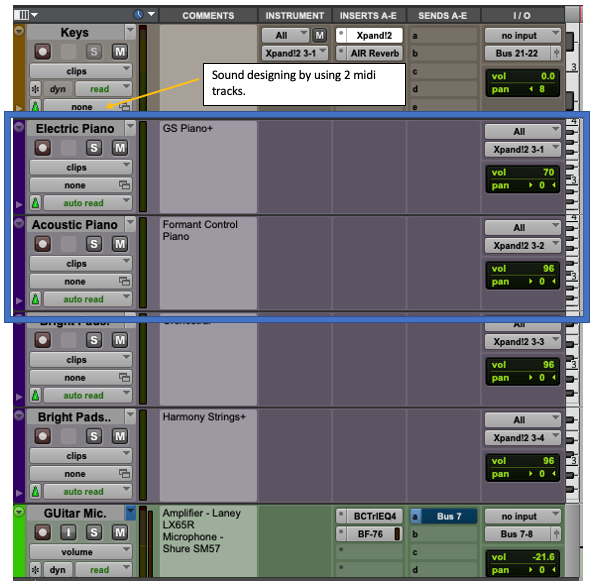
For the Chorus I wanted a piano upright tonality presence, but a bit funky, so I used a combination of 2 midi sounds from Xpand!2 plug-ins library. An electric piano sound (GS Piano+) and an acoustic piano sound (Formant Control Piano) on 2 different midi channels to get something close to what I have in my head. I wanted a vibrate piano sound that popped, but the keys just sounded flat and had no personality about it at all. So, I altered the dB levels on the mixing console of the 2 different piano parts, to see if that would help. It sounded better but the piano still sounded flat.
Xpand!2 below


I did some research on how to get a fuller piano sound and I found out that by using a little reverb on a midi instrument that will help bring out some life into the keyboard sound. I managed to find an old Lynda Pro Tools tutorial. That was an ‘aha’ moment of sudden insight and discovery -Titled - Pro Tools 11 tutorial: Using reverb
Reflection
Plug-in Xpand!2 and Reverb AIR
By experimenting with the plugin Xpand!2 and Reverb AIR, it has given me more insight into what can be achieved by learning basic knowledge. The Xpand!2 can either sound design within the plug-in, (which would be easier than how I did It) or you can allocate a midi track as I did. Sometimes it’s after when the mind's light bulb goes on. Sound designing within the plug-in is more of a practical way of resolving it, but it’s only now that I see the light.
I now can allocate both midi channels in Xpand!2 to midi 1 and mix the sound in the plug-in.
This light bulb moment gives me the opportunity in the future, to become more musical in the creations of sounds for future songs. I will create and expand my sonic landscaping from bland to exciting ear candy.
I now have a good understanding of the parameters on how a reverb plug-in works and how reverb will help bring the digital instrument sounds alive. Once again basic knowledge to grow from is a powerful tool within itself. I knew some aspects of how a reverb worked with the transient but needed a more basic ‘hand-on’ approach so I could make the midi keyboard sounds for a song to become more of a natural quality presence and pleasing to the ear for the listener. Down below I have created a little basic guideline pic for myself that I can use as a guide, for this Reverb plug-in.

References
Learning, L. (2013, October 19). Pro Tools 11 tutorial: Using reverb | lynda.com - YouTube. Retrieved August 25, 2020, from https://www.youtube.com/watch?v=6_j9wHyc7fQ
News, N. (2020, April 28). What is reverberation time and how it is calculated? Retrieved August 25, 2020, from https://www.cirrusresearch.co.uk/blog/2018/04/what-is-reverberation-time-and-how-it-is-calculated/
Soundsnap, |. (2018, February 23). Reverb Tail. Retrieved August 26, 2020, from https://blog.soundsnap.com/glossary/reverb-tail/


Comments